How to Tell Which of Your Agent Terminals Needs You From One Browser Tab
Open several named agent sessions as tabs in the shell.online app, read the badge each tab shows, see which prompts it catches, and check the rest with shell ls.
Artemii Amelin10 min read
Contents
- Step 1: Link the machine that runs the agents
- Step 2: Start each agent as a named session
- Step 3: Open them as tabs and read the badge
- Step 4: Know which lines raise a hint
- Step 5: Make your own scripts ask in a way the tab sees
- Step 6: Check the machine side with shell ls
- What this setup does not do
- Where agents report for themselves
On October 31 DeepSeek published dsh-superagent, an MIT-licensed research prototype of a coding agent that works on one GitHub repository and, optionally, listens to Feishu chats. The README calls it "not an official DeepSeek product". It runs as a bundle for DeepSeek Harness, the company's open source agent harness. When an allowed person asks for work, a main session routes the request, and each piece of work runs in its own worker session and directory. The Next Web's report, citing Bloomberg, says DeepSeek aims it at Anthropic's Claude Code, and the README itself says the published code is not identical to the internal version.
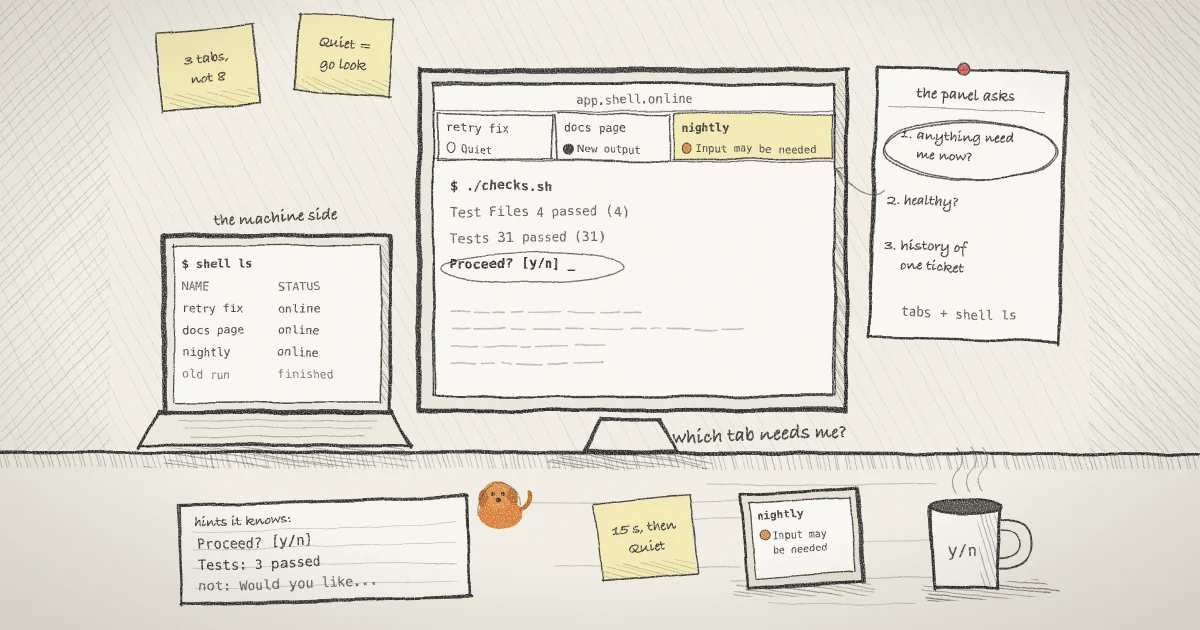
The part worth reading even if you never install it is the design principle. The philosophy document says: "Take as little human attention as possible, and give as much value as possible." The panel document turns that into three questions the supervisor's screen answers in order. The first is "Does anything need me now?" The second is whether the system is healthy. The third is the history of one piece of work.
If you run three or four coding agents yourself, each in its own terminal, nobody has built that panel for you. You are the router, and you answer the first question by clicking through every window. This guide sets up the closest thing shell.online has: named sessions from a linked machine, opened as tabs in the web app, where each tab carries a small badge computed from the output your browser already receives. It also shows which lines the badge recognises, why a Codex approval prompt is not one of them, and how to check the machine side from a terminal.
Step 1: Link the machine that runs the agents
The tabs live in the web app, and the app lists sessions only from machines linked to your account. Linking is optional for plain sharing, but this setup needs it. On the computer that will run the agents:
shell auth
shell whoamishell auth opens a browser approval page and links this machine, so its sessions appear at app.shell.online. Remote start is a separate choice during setup, and you do not need it here. shell whoami prints the linked account.
Step 2: Start each agent as a named session
Give every session a name you will recognise in a tab strip. The command name alone is not enough when two tabs both say codex.
cd ~/src/example-api
shell --name "api: retry fix" codex

cd ~/src/example-docs
shell --name "docs: install page" claude

cd ~/src/example-api
shell --name "api: nightly checks" -- ./checks.shEach command starts the program in the background on this machine and prints a browser link, a session password and a QR code. The --name label shows in shell list, shell ls and the web app, where it can be renamed later. The -- before ./checks.sh tells shell that everything after it is the command to run. The CLI reference lists the other start options, and an earlier post on naming sessions covers labels across several machines.
How many to start is your call. My own view is that three tabs you actually read beat eight you scan past.
Step 3: Open them as tabs and read the badge
Sign in at app.shell.online, open each session from the list, and enter its password or open your personal vault if the password is stored there. A listing alone does not decrypt anything. Tabs stay connected while you switch between them, and that is what makes the badge work: a background tab keeps receiving output, so its badge keeps updating.
The badge is the session pulse, and its code is short enough to read in one sitting in session-pulse.ts. On a tab it is compact: a dot, plus either a hint label or the words New output. Hover over it for the full description. What drives it:
- Activity. The dot reflects one of three states: Not observed, Output active, or Quiet. A tab turns Quiet after 15 seconds without new bytes. The app recomputes the badge at most once a second.
- New output. Bytes that arrive while you are not looking at a pane are counted, up to 1 MiB, and shown as New output. Looking at the pane clears the count.
- Hints. Three fixed labels: Input may be needed, Context limit reported, and Test result reported. A hint expires after two minutes. The label is chosen by the app; no text from the terminal is ever copied into it.
The tracker strips control sequences of the kind defined in ECMA-48 before it looks at text, decodes with a streaming TextDecoder so a character split across two frames survives, and drops any line longer than 1,024 characters. A screen replay after a reconnect can replace a hint but does not count as new output.
The post that introduced the pulse in v0.22 explains why it reports observations and not agent state.
Step 4: Know which lines raise a hint
A hint fires only when a whole line, after trimming spaces, matches one of a few patterns. I ran the tracker from the repository against sample lines to check them. These raise Input may be needed:
Approval required.
Allow this command? [y/n]
Proceed? [y/n]These raise Test result reported. They are the summary lines printed by Vitest, Jest, pytest and cargo test:
Tests  2 failed | 3 passed (5)
Tests:       2 failed, 3 passed, 5 total
===== 3 passed in 0.12s =====
test result: ok. 4 passed; 0 failed; 0 ignored; 0 measured; 0 filtered outAnd Error: context window exceeded raises Context limit reported. These, on the other hand, raise nothing:
Would you like to run the following command?
Do you want to proceed?
> Approval required.The first is the title Codex gives its command approval overlay. In the approval overlay source for Codex 0.164.0 it reads "Would you like to run the following command?", with no [y/n] after it, so none of the patterns match. The same file asks "Do you want to approve network access to" a host for network requests, and that misses too. The third fails because the line has to start with the phrase; a quote marker or a box border in front of it is enough to miss.
A Codex session waiting for your approval gets no hint. Its tab can only tell you that output stopped. If the screen stops changing for 15 seconds the dot goes Quiet; if anything on the screen keeps redrawing, such as a clock, the tab stays Output active, because the tracker counts any new bytes as output. Read Quiet as "go and look", never as "it is waiting for me", and do not assume a tab with no hint is busy.
Step 5: Make your own scripts ask in a way the tab sees
For the commands you write yourself, you can choose the wording. The checks.sh session from Step 2 can stop and ask before a step that needs a person, using the read builtin, whose -p option, as the Bash manual puts it, will "Display prompt, without a trailing newline, before attempting to read any input":
#!/usr/bin/env bash
set -euo pipefail

npx vitest run

read -r -p "Proceed? [y/n] " answer
[ "$answer" = "y" ] || exit 1

./deploy-preview.shThe Vitest summary line raises Test result reported when the tests finish. The prompt then raises Input may be needed even though it has no newline after it, because the tracker checks the line it is holding at the end of every chunk of output; I confirmed that case against the tracker as well. The hint expires after two minutes, while the New output marker stays until you view the tab or the connection drops, so a prompt you miss for a while still leaves a sign. You can answer from a phone too; see the mobile guide.
Step 6: Check the machine side with shell ls
The badge only knows what your browser saw. The second of DeepSeek's questions, whether the system is healthy, is better answered from the account's own records. From any linked machine:
shell ls
shell ls --allshell ls lists the sessions you started on every linked machine, newest first, with ID, name, status, uptime, machine and command. Ended sessions are hidden and counted; --all includes them. The status column uses the same words as the web app:
onlineorstarting: the host is connected or on its way.offline: the host dropped its connection recently and may come back.machine gone: the host has been away for ten minutes and is treated as over, unless the session is persistent.finished: the process exited. This is not proof that the work succeeded;shell ls --jsonincludes the exit code when there is one.unavailableorunknown: the relay has no usable record right now. Check the machine before assuming the process stopped.
shell ls never prints a password. To stop a session, run shell kill -- <ID> on the machine that started it. The reliability guide covers what to do when a session shows offline.
What this setup does not do
- It does not notify you. There is no push notification and no sound. You see the badge when you look at the tab strip.
- It covers only tabs you have open, in the browser you have open. Close the tab or the browser and that session has no pulse. Nothing is stored, and a session you never opened shows no badge at all.
- It does not know what an agent is doing. Quiet means no bytes for 15 seconds. A hint means a line matched a pattern. Neither proves an agent is idle, finished, stuck or successful, and the tooltip says so.
- It does not recognise every agent's prompts. As Step 4 shows, a Codex approval prompt raises no hint, and an agent that wraps its question in a border or a marker will miss as well.
- It does not route work. DeepSeek's prototype has a main session that hands work to workers and a panel built from reports the workers send. shell shows you terminals; deciding which one to answer is still yours.
- It does not answer the third panel question. For the history of one session you have its scrollback, and the opt-in, owner-only session summaries you turn on with
shell permissions <ID> --summaries=true.
The badge can only be computed in your browser because, for a browser share, the relay never holds the plaintext; the encryption page explains why, and the security page covers who can watch.
Where agents report for themselves
The difference between the two designs is where the signal comes from. A browser tab guesses from bytes on a screen. DeepSeek's workers file reports such as ready, waiting, blocked or failed, and the panel derives each piece of work's stage from them in a table the execution document lays out row by row. Once agents run on more than one machine, that kind of report needs a way for one agent to reach another directly.
That is the layer Pilot Protocol, the team behind shell.online, works on: each agent gets an address and an encrypted tunnel to the peers it trusts. The Pilot post on building a self-organizing agent swarm shows agents announcing their role on a pub/sub topic and building their own roster from those announcements, with no central scheduler. A worker that announces it needs a person beats a tab that went quiet. Until your agents do that, the tab strip and shell ls are the panel, and the source for both is in the shell.online repository.
Put your agents in tabs you can scan
Link a machine with shell auth, start each agent with a name, and open them side by side in the web app. Encrypted end to end, with the badge computed in your own browser.
Read the shell.online docs