How to Run Codex in Parallel Git Worktrees and Tell the Sessions Apart
Give each Codex task its own git worktree and a shell.online session name, then find, open and stop the right one from shell ls or your phone.
Artemii Amelin10 min read
Contents
OpenAI released Codex CLI 0.162.0 on October 8. The headline item in its notes is a set of tools for creating and listing managed Git worktrees from trusted local projects, available when the worktrees feature is enabled. The same release lets you pin a task in the agent Command Center with the p key, and a 0.162.1 patch followed the next day with two crash and startup fixes. OpenAI's own worktrees page states the reason in one line: worktrees let Codex run multiple independent chats in the same project without interfering with each other.
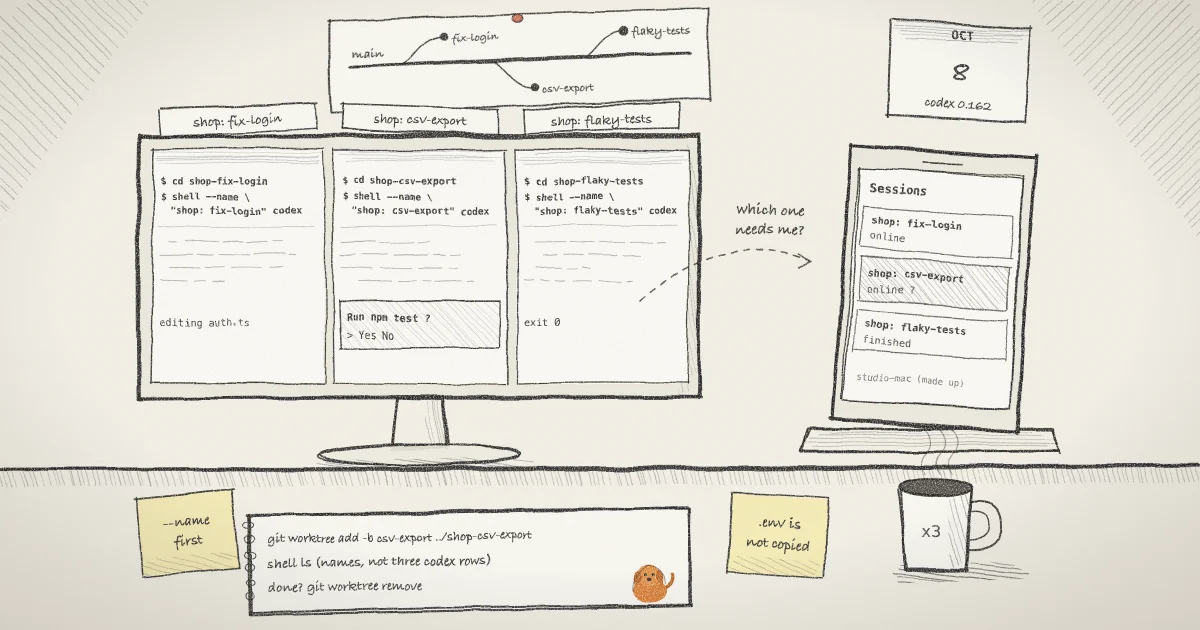
That is the direction every coding agent is going. Claude Code has a --worktree flag for parallel sessions, and the Codex desktop app creates managed worktrees under $CODEX_HOME/worktrees. Once you have three agents working in three checkouts of the same repository, the hard part stops being the agents. It is knowing which terminal is which when you are away from the desk and one of them stops to ask a question.
This guide does it with plain git worktree commands and shell.online, so it works with the Codex CLI you already have and does not depend on the new feature flag. You will create one worktree per task, start Codex in each one with a session name, find them again with shell list and shell ls, open the right one from a phone, and clean up when each task is done.
Step 1: Install shell and link the machine
Install the CLI on the computer that holds the repository. The installer checks release checksums, and the platforms page lists Homebrew and the other options.
curl -fsSL https://shell.online/install | sh
shell authshell auth is optional for sharing a single session, but this guide needs it. It links the machine to your account, which is what makes shell ls and the session list in the web app work. It opens a browser on an approval screen; on a machine with no browser, shell auth --no-browser prints the URL instead. What gets published to the account is the share URL, the command name, the host name and the timing. Terminal contents and the encryption key are not, as the security page explains.
Codex itself installs from OpenAI's Codex CLI quickstart, which tells you to open a project directory and run codex. That matters here: the directory you start Codex from is the checkout it edits.
Step 2: Create one worktree per task
From your main checkout, make a linked worktree for each piece of work, each on a new branch. The repository here is called shop, and the three tasks are invented.
cd ~/code/shop
git worktree add -b fix-login ../shop-fix-login
git worktree add -b csv-export ../shop-csv-export
git worktree add -b flaky-tests ../shop-flaky-tests
git worktree listEach add creates a directory next to the main checkout and checks the new branch out into it. git worktree list prints the main worktree first and then each linked one, with the commit and branch it has checked out. The git manual describes a linked worktree as sharing everything with the repository except per-worktree files such as HEAD and the index, so the three agents get separate files on disk but one shared history.
Two git rules will save you a confused agent later. Git refuses to create a worktree for a branch that is already checked out in another worktree, so two agents cannot quietly share a branch. And a worktree is a fresh checkout, so files your .gitignore excludes, such as .env, are not there. Both OpenAI and Anthropic handle that with a .worktreeinclude file for the worktrees their own tools create. Plain git worktree add does not read that file, so copy what the task needs by hand.
Step 3: Start Codex in each worktree with a name
Without a name, every row in shell list and shell ls shows the same command, codex, and that is the whole problem. --name fixes it. Put it before the command:
cd ../shop-fix-login
shell --name "shop: fix-login" codex

cd ../shop-csv-export
shell --name "shop: csv-export" codex

cd ../shop-flaky-tests
shell --name "shop: flaky-tests" codexEach command starts Codex in the background and returns your prompt once the share is ready. I read the macOS and Linux start path in the source: the background process is started without changing directory, so Codex begins in the worktree you were in. Each start prints a card like this, with your own link and password in place of the placeholders:
  Name       shop: fix-login
  Open       (your link)
  Password   (ten characters)
  Vault      saved to your account vault
  Access     view and type · end-to-end encrypted
  Session    a1b2c3d4e5 · background
Closes when the task exitsThe name is a label of up to 120 characters on a single line. The CLI rejects control characters and the Unicode direction overrides that can make text print backwards, so a name cannot be made to read as something else in a list.
Each session is a separate share with its own link and password, which is what you want: you can hand a teammate the csv-export session without giving them the other two. If someone should only watch, start that one with shell --read-only --name "shop: csv-export" codex instead, and the relay rejects browser input for it.
Step 4: Find the sessions from a terminal
On the same machine, shell list shows what is running locally:
shell listIn a terminal at least 132 columns wide it prints a table with ID, NAME, UPTIME, RELAY, CLOSES, ACCESS, COMMAND, SHARE URL and PASSWORD columns. The NAME column is cut at 24 characters, which is why short names work better. In a narrower window it prints one block per session instead, headed by the ID and the name, with the command, closing rule and link underneath. The PASSWORD column only says whether one is stored; shell password <ID> prints it when you mean to.
For a script, use the JSON form and pick the fields you need with jq:
shell list --json | jq -r '.[] | "\(.id[0:10]) \(.name) \(.relay_status)"'That prints the short ID, the name and the relay status for each session, one per line. relay_status holds the raw value, such as connected, waiting or disconnected.
shell list --json includes the passwords. Each record carries an e2ee_password field next to the share URL, because it is the interface agents use to hand a session to an operator. Pipe it through a filter like the one above, and do not paste the raw output into a chat, an issue or a log. shell ls --json is different: it never prints a password.
From any linked machine, shell ls lists the sessions in your account instead:
shell ls
shell ls --all --json | jq -r '.[] | "\(.name) \(.status) \(.exit_code // "-")"'The table has ID, NAME, STATUS, UPTIME, MACHINE and COMMAND columns, with the name cut at 32 characters. Status uses the same words as the web app: online, starting, offline, finished, unavailable, unknown, or machine gone for a session whose host has been disconnected for ten minutes without reporting an exit (persistent sessions excepted). Ended sessions are hidden and counted on the last line; --all brings them back. The JSON records include exit_code once an exit has been recorded and started_at as an RFC 3339 timestamp, so the second command tells you which sessions have ended and with what exit code. An earlier post on --name and shell ls covers the cross-machine side in more detail.
Step 5: Open the right one from your phone
Open app.shell.online on the phone and sign in with the same account. The session list shows each session by its name rather than its command, so the three Codex runs read as three different branches. Tap one, open it with the password from its card, and you are in the live terminal, where you can read what Codex is doing and answer it. The mobile guide covers the controls on a small screen, and the post on the activity pulse covers telling a busy session from one that is waiting.
If a name turns out to be wrong, say because you moved a task to a different worktree, rename it on the session page with the pencil next to the title. The name is saved as typed, up to 120 characters, and a blank name clears it so the session falls back to its default title. The rename is stored on the account, so shell ls shows it too. The app lets the person who started the session, anyone it is assigned to, and the team's owners and admins rename it, since naming is housekeeping and not control over the machine.
Step 6: Step in, then clean up
Back at the desk, you can take one session into your own terminal without stopping it:
shell attach a1b2c3An ID prefix works if it is at least six characters and matches only one session. Press Ctrl-X, release it, then press D to detach. The browser link stays live the whole time. When you quit Codex, the process exits and its share closes on its own. To stop one from outside:
shell kill a1b2c3Then review the branch the way you would review anyone's, for example by opening a pull request from it, and remove the worktree from the main checkout:
cd ~/code/shop
git worktree remove ../shop-fix-loginGit only removes a clean worktree, one with no untracked files and no changes to tracked files. If it refuses, look at what is left before reaching for --force, because that is uncommitted work from the agent.
What this setup does not do
shell does not create, track or remove worktrees. Its session lists do not show which directory a session started in, so the name you give it is the only link between a session and its worktree. Names are not unique and not locks: two sessions can carry the same name, and nothing stops you from starting a second agent in a worktree that already has one.
A worktree is not a sandbox. All three agents run as your user, with your files and credentials, and they share one .git directory, so a branch deleted or rewritten from one worktree is deleted or rewritten for all of them. Keep Codex's own sandbox and approval settings in place; the OWASP entry on excessive agency is a good list of what to keep from an agent that does not need it. shell gives you a way to watch and answer each run, not a boundary around it.
This also does not reach the managed worktrees that the Codex desktop app creates. Those chats live inside the app. shell shares terminal processes that you start through it, and it does not attach to a process that is already running. Finally, the host has to stay awake and online for the links to work.
Where Pilot Protocol fits
Three agents in three worktrees cannot see each other's terminals, and sometimes one has found exactly what another needs. shell.online is built by Pilot Protocol, whose network is for that kind of agent to agent traffic. The guide to connecting Codex CLI to Pilot Protocol adds Pilot's hosted MCP server with codex mcp add, which gives Codex its own Pilot node with messaging tools such as pilot_send and pilot_inbox. Pilot's networking guide for multi-agent systems covers the addressing, trust and encrypted tunnels underneath. I would keep that optional: worktrees and session names are enough to run parallel tasks, and a message channel between agents is one more thing to review. The source for shell is on GitHub, and the full command list is on the CLI reference.
Name your next parallel run
Install shell, start each Codex task with --name in its own worktree, and open the one that needs you from your phone.
Read the shell.online docs